Wednesday, December 2, 2015

Little Round Things

These are called "Little Round Things" because, well...first I wanted to call them Sconeamon Buns. We took a batch up to Mary's mom to try because she is a great pastry tester! The next day, my Mary was up there and her Mom asked her if she had brought more of the "little round things", so there you go.

These are not easy if you have never made scones before, but I think I can walk you through it pretty well. If not, we'll set up a demo down here in the Bear Creek Bakery Kitchen and have us a time!


My basic scone dough is the dry and crumbly type and it works best for this recipe.

Ingredients:
2 1/2 cups flour
1 cup sugar (sifted if there are lumps)
1/2 teaspoon salt
2 1/2 teaspoons baking powder
2/3 cup milk or Half and Half
1 whole stick chilled butter
1/2 stick (or a little more) softened, spreadable butter
Cinnamon, about 2 tablespoons or to taste
Brown sugar, about 12 teaspoons

Directions:
Mix all the dry ingredients together well (except the cinnamon and brown sugar).
Add the one whole stick of chilled butter cut into small pieces (about 1/4 inch thick) into your dry flour mixture.
Work the butter well into your flour, mixing by hand until you can feel no more lumps of butter.
Make a well at the bottom and add 2/3 cup milk or Half and Half (for a richer flavor).
Mix (but don't overmix) with a large spoon until everything is incorporated, it will be lumpy.

Preheat oven to 400 degrees

Lightly spray an airbake pan (my favorite method) or a good, thick cookie sheet with baking spray; set aside.

Dump 1/2 cup of flour on your kitchen table (if you don't mind cutting on it) or a large cutting board. Mix it around a bit with your hands because you'll need it on them, until it's a spot about 12 inches by 12 inches. Go back to your dough and bring it together by hand just enough so you can get it from the bowl in one piece and lay it on the flour on your table or cutting board. Push down lightly to cover the bottom quarter of the dough with flour, turn it 90 degrees and push down again doing the same thing. Repeat this process until all four sides are done. Now form the dough into a dome and push it
flat to about three inches thick. Turn over and push down again to about 1 inch thick. Begin pressing flat by hand (turning over carefully to incorporate a little more flour for easier handling if necessary) into a rectangle about 8 inches wide and 12 inches long. It should be about 1/2 inch thick. Once that's all done, the fun begins.

Butter the dough rectangle liberally. Sprinkle liberally with cinnamon (good cinnamon like Ground Saigon Cinnamon from Costco) or whatever you have on hand. The next part may take a little practice, but you'll get it soon. Roll the dough the long way, pressing it together lightly with your fingertips as you go. Once you have formed your roll completely, push the ends together lightly toward the center of the roll. Work the roll lightly with your hands until it's evenly sized. It will be
12 inches or so long. With a very sharp knife (I use my Chinese Cleaver), cut the roll into 12 even pieces with one quick downward stroke.

Place the rolls evenly on your baking sheet flat side down, I make 4 rows of three rolls each. Put a teaspoon of brown sugar on top of each one of the rolls and don't worry if some of it falls on to the baking sheet. Then drizzle about a teaspoon of melted butter on top each one of the rolls and the brown sugar.

Place in your preheated oven and bake until the edges just begin to brown and the tops of the rolls begin to turn golden brown. My oven takes 16 to 18 minutes, so begin checking them after about 15 minutes just to be sure. Use your oven light, don't open the door.

When finished, remove from oven and let them sit on the baking sheet 4 to 5 minutes. Remove to a cooling rack and just try not to eat one immediately.

These sound rather labor intensive, but after you get the hang of the recipe, you can turn them out in about 12 to 15 minutes, so a second batch right after the first is gone, is easy! And that's a good thing, because they sure disappear quickly!

Tuesday, October 13, 2015

Kitchen Table Ginseng Tea - It will change your life!


     The ginseng we use in our Kitchen Table Ginseng Leaf Tea has been locally harvested. The majority of it has come from right here on our land! The green tea we add is full-leaf Numi organic gunpowder green tea.
     Wild ginseng has been used for thousands of years by people of the Orient and native Americans in this area. It is believed that ginseng was discovered in the mountains of Northern China (Manchuria) over 5000 years ago. It was probably first used as a food. Records, however, show that ginseng was used for medicinal purposes over 3,000 years ago. The old Chinese Canon of Medicine states that ginseng strengthens the soul, brightens the eyes, opens the heart, expels evil, benefits understanding and if taken for prolonged periods of time will invigorate the body and prolong life. There was also a belief that the ginseng root resembled the human body!
     Because Chinese emperors revered ginseng and were more than willing to pay for ginseng with its weight in gold, a flourishing industry sprung up centuries ago, attracting diggers, traders and robbers. China’s demand for wild root afforded Korea the opportunity to maintain a thriving export business that dates back to the 3rd century AD. Unfortunately, this lucrative trade practically wiped out wild ginseng in Asia and eventually came to a halt. In the sixteenth century Korea started began experimenting and cultivated the world’s first farmed root.
     In America, ginseng was used by several North American Indian nations. The Iroquois, the Menomonee, the Cherokee and the Creeks all valued ginseng for its curative powers and life enhancing capabilities. It is estimated that American settlers discovered ginseng in the mid 1700’s in New England. By the late 1700's shipments of ginseng were being sent to China and considerable fortunes were being made. By the mid 1850’s a half million pound were being harvested from America's wild ranges and exported to Asia. By the turn of the twentieth century, ginseng was almost extinct in this country. Over harvesting had almost wiped out American's natural range.
     Early attempts to cultivate ginseng in America failed until the early 1900’s when many Eastern farmers began cultivating small gardens of the plant. The methods of ginseng cultivation spread West to the farms and woods of Wisconsin. Located in north central United States, Wisconsin has ideal growing conditions that make it a leader for ginseng production. Now known as “home of the World's Finest Ginseng Root” some say they used to be called the “Dairy State!”.
     Green tea and ginseng are two of the oldest medicinal beverages, and both have numerous health benefits. You can take them together as a tea for a potent boost in energy and mental clarity. Both have health-promoting antioxidants that help prevent free-radical damage in the body, making ginseng and green tea a delicious and powerful concoction.
     As a slow growing perennial and a preference for deep forests ginseng became known throughout the world as ‘the plant that hides from man’. Ginseng’s unique properties and incredible popularity have lead to the over-hunting of wild ginseng and makes it hard for the ginseng to hide. In Asia, highly sought after wild ginseng has been hunted and harvested to near extinction.
     Ginseng fairs somewhat better in the United States partly due to the passage of protection laws which regulate it’s harvest. Still, there is very little wild ginseng left in America. Currently, 99% of the world ginseng crop is cultivated; grown in gardens and on small farms. A form of cultivated ginseng know as ‘woods-grown’ ginseng is also planted and cared in by farmers under the naturally sheltered conditions.
Antioxidant Power
     Green tea is widely recognized as an excellent source of powerful antioxidants called catechins, according to Harvard Health Publications. A number of studies show that green tea may reduce the risk of several cancers, including skin, lung, breast, colon, esophageal and bladder. According to the University of Maryland Medical Center, ginseng tea may help lower the risk of developing lung, liver, pancreatic, ovarian and stomach cancers and may slow the growth of tumors. An article published in “Food and Chemical Toxicology” in September 2011 revealed that ginseng increased the levels of key antioxidants such as glutathione.
Cardiovascular Support
     Both ginseng and green tea support cardiovascular health as well. According to Harvard Health Publications, regularly drinking green tea prevents the oxidation of low-density lipoprotein -- or “bad” cholesterol -- raises beneficial high-density lipoprotein levels, improves artery function and reduces hypertension. Add ginseng to the mix and you get LDL-lowering effects, according to the University of Maryland Medical Center. Ginseng is controversial for high blood pressure, however, because studies have shown ginseng to both lower and raise blood pressure, depending on the dose and other factors.
Other Benefits
     Ginseng has been found to improve mental and physical performance, increase stamina, promote sexual health and support healthy aging, according to research published in the August 2000 “Fitoterapia.” Ginseng also seems to support the immune system by improving the number of immune cells in the blood, according to the University of Maryland Medical Center. Thus, ginseng may reduce your risk for getting a cold and lessen the severity of a cold or the flu if you do get sick. Green tea has been shown to strengthen bones and improve bone mass, according to research published in “Nutrition Research” in July 2009. Green tea may also support oral health and protect the brain, along with it numerous other health benefits, according to a review published in the “Journal of the American College of Nutrition.”
Health Warnings

     The combination of ginseng and green tea may improve health; however, there are known side effects of both substances. Green tea in excess can cause anxiety, insomnia and irritability due to its caffeine content, according to the University of Maryland Medical Center. Green tea should be avoided in pregnancy and lactation, and if you have heart problems, high blood pressure, kidney or liver problems, stomach ulcers or psychological disturbances. Ginseng should also be avoided in pregnancy and lactation, as well by those who have bipolar disorder, insomnia and autoimmune disorders. Check with your doctor before taking Asian ginseng if you are taking pharmaceutical medications. High doses of ginseng have been known to cause side effects that may include anxiety, restlessness, diarrhea, vomiting, headache, vaginal bleeding, high blood pressure and nosebleeds.

Thursday, May 28, 2015


Todays bags have something new for you – fresh wild raspberry leaves. They can be used for tea, a very soothing tea with a little honey or some raw sugar. Native Americans believed the raspberry leaf tea was an aid in childbirth. It does strengthen the walls of the uterus over time. (Given it’s effects on the uterine walls, if you are pregnant, please do not consume this tea without consulting with your physician.) It also aids in keeping your mouth tissues and gums in good health. Simply chop up a dozen leaves, steep them in boiling water for ten minutes and then strain the tea into a cup with a little honey before you go to bed or as a treat in the middle of the afternoon.


In addition to the raspberry leaves we have our mix of Spring Greens for you again. This is probably the last time we will be harvesting from this bunch. As hard as we try (read as hard as MARY tries), some of the greenhouse dirt can be a little stubborn after six weeks. Please give your lettuces a wash and a spin before you eat them this week. The oregano we have sent along today is good to go!

There is a bag of Chickweed again, too. We do so love this little wild green…especially tossed with a little walnut oil and lemon juice! If you want something a little different, try this -

Chickweed pesto is one of my favorite food staples. We like to have chickweed pesto as many times as possible during the season. We put it on our eggs in the morning and enjoy a dollop on top of meats and veggies throughout the day. It also makes a great sandwich spread. Got lots of chickweed? Freeze it in ice cube trays for later!

Ingredients - 2-4 cloves of garlic, minced - 1/2 cup of extra virgin olive oil - 2-3 cups freshly picked young chickweed leaves - 1/4 cup freshly grated parmesan cheese - dash of sea salt - handful of walnuts or pine nuts(optional) -tablespoon of lemon juice (optional) - lemon zest (optional)
And if you want something REALLY different, here’s how to make a chickweed salve – macerate about 1/2 cup of the leaves and mix it with a 1/2 teaspoon of olive oil. That’s it! And it’s great for your skin or on minor burns or skin eruptions. It’s a soothing salve for diaper rash, too.

Now that you’ve had a chance to try the nettles on your own, we’d like to share a couple of our favorite recipes, starting with Garlicky Nettle Pesto – we give you about 1/4 pound of nettles so you will need to pick some more or adjust this recipe by 1/2 -

Makes: 1 generous cup
1/2 pound nettles
4 large garlic cloves, smashed
1/2 cup toasted pine nuts
1/2 teaspoon salt
Freshly ground pepper
1 tablespoon freshly squeezed lemon juice
1 1/4 cups extra virgin olive oil
1/3 cup grated Parmesan cheese

Bring a large pot of salted water to a simmer for the nettles. Add the nettles directly from their bag and cook, stirring continuously, for 2 minutes. Dump into a colander to drain. When the nettles are cool enough to handle, wrap them in a clean dishtowel and wring out as much moisture as possible, like you would for spinach. You’ll have about a cup of cooked, squished nettles.
In the work bowl of a food processor fitted with the paddle attachment, whirl the garlic, pine nuts, salt, and pepper to taste until finely chopped. Add the nettles, breaking them up as you drop them in, and the lemon juice and whirl until finely chopped. With the machine running, add the oil in a slow, steady stream, and process until smooth. Add the cheese, pulse briefly, and season to taste with additional salt, pepper, or lemon juice.

And a here’s a nettle/sweet potato soup that’s out of this world -

Two large sweet potatoes, peeled and diced and a baking potato, peeled and diced – 3 or 4 scallions from your bag, also minced - As much garlic as you wish, minced finely
Spices: cumin, cinnamon, coriander, cloves, star anise – take your pick and add them in the last five minutes of cooking time
Lots of fresh nettle tops
A can of garbanzo beans and organic vegetable stock, about 3 pints

Simmer it all together until the potatoes are soft, about 25 minutes. You can whirl it all together with your hand blender if you like or enjoy just the way it is.

Thursday, April 23, 2015

Lemon Squares


1 C - Flour
1/2 - C Butter
1/4 - C Powdered Sugar
2 - Eggs
1 C - Sugar
1/2 tsp - Baking Powder
1/4 tsp - Salt
3 Tbsp - Lemon Juice (fresh-squeezed juice is mandatory!)

The Best Lemon Bars Recipe
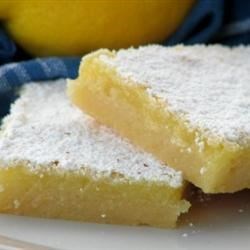
Measure flour, blend with butter and powdered sugar. Press mixture into bottom of 8x8 pan. Bake 20 minutes at 350 degrees. Beat remaining ingredients together and pour over crust. Bake an additional 20 - 25 minutes. Do not overbake! Filling puffs up a little while baking then flattens when cooled. Sprinkle with powdered sugar when you remove it from the oven.


Originally from the Betty Crocker Cookbook, ca. 1950. Has appeared countless times in church cookbooks ever since! Very tasty, very simple and they don’t last long!

Wednesday, March 25, 2015

Come see our new farm store!

We have become a "Point of Sale" farm! As of this moment, we have fresh organic eggs, fresh-ground wheat flour and assorted breads for sale.
One dozen fresh organic eggs - $3.50
Wheat bread - $3.50
White bread - $3.50
Sourdough wheat bread - $3.50
Fresh-ground whole wheat flour - $2.50 per pound
Sourdough starter - $5.00
We have cleaned up the garage and have it set up for selling from there. There is a refrigerator right there for the eggs and anything else we need to keep cool.
If you want fresh-baked bread (or anything else we offer), call us before you come out to see what we have available. That being said, we will ALWAYS have eggs and flour on hand. Can't wait for the produce to start appearing so we can sell that, too. We're not far from being able to offer fresh-picked greens, foraged greens, wild onions and morels! Yes we will be selling morels, so spread the word for us!
We are also beginning the process of corning our own beef brisket today.
Hope to see you soon.


Thursday, March 12, 2015

Good Morning, Honey!

IMG_20150312_114258_783[1]We had an unforeseen tragedy in February. With the combination of frigid temperatures and strong west wind that really made the wind chills bad, our remaining beehive froze. Sad as that is, the bees left us a legacy...a SWEET legacy!

We are replacing both hives in a couple of weeks, but it's an expensive proposition. How about a Kitchen Table CSA Honey Share? Call us if you can invest in our honey operation - 563-568-3829 -

The honey is superb (and I'm not just saying that 'cause it's ours)! It has a hint of citrus and berries that is absolutely exquisite! We can't get enough of it on fresh-baked wheat bread toast!

What’s new for 2015


IMG_20130617_204551_717

We are very excited to let you know about a couple of things happening here at the farm for this new season. The first is all about strawberries. We will have a lot more this year than last. There are two varieties and that will increase our harvest time by about three or four weeks, from the first part of June through mid-July. Those of you who hold shares in the CSA will see them in your bags for at least two weeks this year. Those of you who wish to come out and pick or purchase your own berries will be served on a first-come, first-served basis. Call us or watch the blog and Facebook for availability.

The second is all about sweet corn. We are field-planting two varieties this year. That will give shareholders lots of fresh sweet corn this year. Again, if you wish to come out and pick or purchase your own, call or check the blog or Facebook pages for availability.

We will have a roadside stand this year, too! Plans at this point are to open the stand from Thursday through Sunday, 7 AM to 7 PM. Breads will be available most days and organic eggs from Blake Family Farms will be available every day.

Greens are being planted in the hoophouse this week…we’ll be having fresh-picked salads in no time!

Watch for the announcement of the foraging workshops, too. That’s not far away either!

Tuesday, March 3, 2015

Lemon Bread


This is a very good lemon bread that doesn’t take a lot of work. I like to serve it with fresh sliced strawberries or fresh-frozen strawberries spooned over the slice. We have a couple of bags of fresh-frozen raspberries left in the freezer. I believe tonight’s lemon bread will have them spooned over it!

Ingredients
------------------
1/2 cup butter
1 cup sugar
2 eggs
1/2 cup milk
1 1/2 cups all-purpose flour
1 teaspoon baking powder
1/2 teaspoon salt
1 lemon, rind of
Glaze
------------------
1 lemon, juice of
1⁄4 cup sugar
Directions
----------------------------------------
In a large bowl, cream butter and sugar. Add eggs, one at a time, beating until creamy. Blend in milk.
In another bowl, mix together flour, baking powder, salt and lemon rind. Pour into batter. Stir to moisten.
Scrape into greased 9 x 5 inch loaf pan.
Bake in 350f degree oven for 55 to 60 minutes.
Cool in pan for 5 minutes.
Remove to rack and while still hot, with a toothpick poke holes all over the top of the loaf, and spoon glaze evenly over. Cool.
Glaze:
Combine lemon juice and sugar in saucepan. Stir and heat till sugar is dissolved. Spoon evenly over top of hot loaf.

Monday, February 23, 2015

Peach upside-down Muffins


Start by making up this basic muffin recipe. Keep in mind, you can not use paper liners for this particular recipe! Spray or grease your muffin tin for best results.
Basic Muffins
Ingredients
2 1/2 cups flour
3/4 to 1 cup sugar
2 1/2 teaspoons baking powder
1/8 teaspoon salt
1 large egg
1 1/2 cups milk
3/4 cup melted butter
1 teaspoon vanilla (or flavored extract to match your muffin creation)
Directions
Preheat oven to 400 degrees. Grease or line your muffin tin(s). Mix dry ingredients together well in a mixing bowl. Mix egg and milk together well. Add melted butter. (When I make my muffins, I like to mix the wet ingredients together in a quart jar with a tight-fitting lid. Just shake the heck out of everything for a good mix!)
(If you are adding fruit or raisins to your muffins, do it at this point. Mix together well with the dry ingredients.)
Make a well in the dry ingredients and add the liquid. Stir together with broad, sweeping strokes until just blended. (Over-mixed batter makes tough  muffins) Evenly distribute batter into greased or paper-lined muffin tin(s). Bake at 400 degrees 16 - 20 minutes, until golden brown.
Makes 12 muffins.

Now for the upside-down part. Put a generous teaspoon of butter for each muffin in the greased tin. Add a generous teaspoon of brown sugar for each muffin. Then put one or two peach slices (home-canned or fresh are best!) into the bottom of each one of the muffins. Fill each one of them with the batter you just made. Bake at 400 degrees for 20 minutes. Allow them to rest on a wire rack for about ten minutes, then give each muffin a gentle twist to loosen it from the tin. If they won’t twist, run a paring knife around the edge of the tin, all the way to the bottom. Invert the entire pan onto a wax paper-lined cookie sheet, leaving them upside-down on the pan. They’re ready eat as soon as they are cool enough to pick up…try to make the dozen last for at least an hour if you can!

Saturday, February 21, 2015

Pancakes on a Winter Morning


We’ve been enjoying pancakes for breakfast on these cold winter mornings. If you’re going to be working outside when it’s zero or colder, it’s a darn good idea to have some food in your belly that’s a good fuel. And a pancake breakfast is just such a thing!
The first one is our favorite sourdough pancake recipe. It’s a great way to use a little of your sourdough starter so you can keep it fresh and lively. (I have a killer sourdough chocolate cake recipe for this purpose, too. That will be posted here soon!)
Sourdough pancakes tend to be a bit on the thin side (at least mine are) but they are very light. They’re superb with fresh fruit and real maple syrup, fresh fruit and honey or fresh fruit with a little brown sugar/butter sauce. We had some of our frozen strawberries from last spring and a little of the brown sugar/butter sauce and another batch with maple syrup (from the Yellow River Valley down by Luana) and some of the peaches we canned up last summer. Dream up your own toppings…you won’t go wrong!

Sourdough Pancakes
Ingredients:
2 cups sourdough starter, room temperature
2 tablespoons granulated sugar
1 egg
4 tablespoons olive oil
1/2 teaspoon salt
1 teaspoon baking soda
1 tablespoon warm water

Preparation:
In a large bowl, add sourdough starter, sugar, egg, olive oil, and salt; mix well; set aside.
In a small bowl, dilute 1 teaspoon baking soda in 1 tablespoon of warm water; set aside until ready to bake your pancakes.
Important: Only add the baking soda/water mixture to the pancake batter just before you are ready to cook the pancakes. Make certain everything is ready to go, the griddle hot, so the sourdough can be cooked while the air is still working in the batter. This will produce light sourdough pancakes that melt in your mouth.
When ready to cook your sourdough pancakes, fold the baking soda/water mixture gently into the prepared pancake batter (do not beat). This will cause a gentle foaming and rising action in the batter. Let the mixture bubble and foam a minute or two before using.

Never-fail Fluffy Pancakes
This recipe is one of those easy ones that really exaggerate your culinary skills. Some folks have trouble making light and fluffy pancakes. If they start using this recipe, they’ll be opening up their own pancake house in no time! They are easy and they will amaze family and friends alike!
3/4 cup milk
2 tablespoons white vinegar
1 cup all-purpose flour
2 tablespoons white sugar
1 teaspoon baking powder
1/2 teaspoon baking soda
1/2 teaspoon salt
1 egg
2 tablespoons butter, melted
cooking spray

Directions
Combine milk with vinegar in a medium bowl and set aside for 5 minutes to "sour".
Combine flour, sugar, baking powder, baking soda, and salt in a large mixing bowl. Whisk egg and butter into "soured" milk. Pour the flour mixture into the wet ingredients and whisk until lumps are gone.
Heat a large skillet over medium heat and coat with cooking spray. Pour 1/4 cupfuls of batter onto the skillet, and cook until bubbles appear on the surface. Flip with a spatula, and cook until browned on the other side.

Saturday, February 7, 2015

Lemon Squares


When life hands you lemons…
That’s exactly what happened today. A box from a friend in Phoenix arrived with some local boutique olive oils and nine fresh-picked lemons! What an excellent midwinter treat and pick-me-up!
This recipe is from the “Belles of Bethel” cookbook from the ladies (submitted by Thelma Schuck) of Bethel Lutheran Church near Parkersburg, Iowa. The book itself dates from 1980, but I have no idea how old the recipe is. I can tell you this much – they are delicious and simple to make.

Ingredients
1 Cup Flour
1/2 Cup Butter
1/4 Cup Powdered Sugar
2 Eggs
1 Cup Sugar
1/2 Teaspoon Baking Powder
1/4 Teaspoon Salt
2 Tablespoons Fresh-squeezed Lemon Juice


Pre-heat oven to 350 degrees
Measure flour, blend with butter and powdered sugar and mix well using your hands or a pastry cutter (it will look like shortbread dough). Press evenly into 8 x 8 pan. Bake 20 minutes. Beat remaining ingredients together well. Pour mixture over crust and bake 20 – 25 minutes more, until lightly browned on top. Filling puffs while baking, but settles down as it cools. Sprinkle with powdered sugar after you remove it from the oven. Cool and cut into small squares.

Thursday, February 5, 2015

Early CSA Sign-ups Save $150.00!

Sign up today and save big bucks! Call us at 563-568-3829, e-mail staff@kitchentablecsa.com or send a check in the amount of $500.00 made out to Kitchen Table CSA, 511 Bear Creek Drive – Dorchester, Iowa – 52140.

Thanks!

Thursday, January 22, 2015

Farmer Cookies


Some years back I inherited my Grandma Abbas’ personal recipe book. It’s an old Car-Ferry notebook in which she hand wrote all of her best/favorite recipes. Each one contains notes as to where she got it, variations, who likes it, etc. This particular recipe has the following notations: “These are great cookies if you are in a hurry. They are also about the best cookie recipe for the wood stove. They hold up well in a medium or hot oven. You can use a variety of ingredients above and beyond what I have listed here. They keep well and are good dunkers. Jeffrey likes them a lot. Eats more than any three-year-old I have ever seen!”
Obviously, I don’t remember eating a lot of them as a three-year-old but I do remember the cookies. Grandma would often make them with M&M’s instead of chocolate chips. When Christmas rolled around, she made them with crushed candy canes and chocolate chips. It is an amazingly customizable recipe, so have some fun with it.
It does say to “drop by tablespoon” onto a cookie sheet. I found the batter to be too dry for that so I simply made golf ball sized balls and baked them that way. Worked like a charm!


Farmer Cookies
1 cup vegetable shortening
1 cup white sugar
1 cup brown sugar
2 eggs
2 teaspoons vanilla
2 cups flour
2 teaspoons baking powder
1 teaspoon baking soda
1/2 teaspoon salt
2 cups oatmeal (uncooked)
2 cups corn flakes or 2 cups crisp rice cereal (either one works nicely)
1 cup flaked or shredded coconut (optional, but very good with the chocolate chips!)
1 cup chocolate chips
1 cup chopped nuts (optional)
Directions
1  Melt shortening, pour over sugars. Mix well.
2  Add eggs and vanilla and mix well.
3  Stir dry ingredients together and add to sugar mixture. Mix lightly.
4  Add oatmeal, cereal, coconut, chocolate chips, and nuts and mix well.
5  Drop by tablespoon on greased cookie sheet.
6  Bake at 350°F for 10 to 12 minutes.
Makes 4 dozen cookies

Friday, January 16, 2015

Make your own Kimchi–Day One


10 Litre German Fermentation Pot
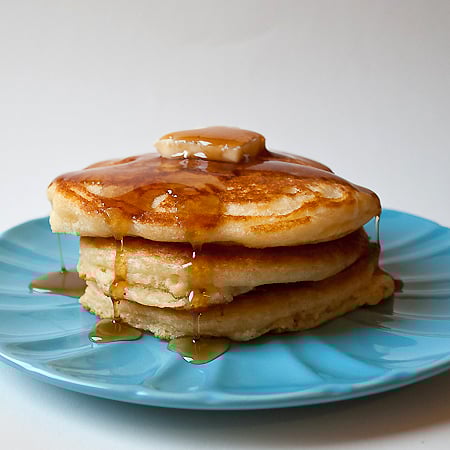
OK…we’re ready to go! Here is the basic recipe we started with last summer, a great one to start with if you’ve never made kimchi before.
Basic_kimchi
1 (2-pound) Napa cabbage
1/2 cup kosher salt
8 ounces Daikon radish, peeled and cut into 2-inch matchsticks
4 medium scallions, ends trimmed, cut into 1-inch pieces (use all parts)
1/3 cup Korean red pepper powder
1/4 cup fish sauce
1/4 cup peeled and minced fresh ginger (from about a 2-ounce piece)
1 tablespoon minced garlic cloves (from 6 to 8 medium cloves)
2 teaspoons Korean salted shrimp, minced
1 1/2 teaspoons granulated sugar


IMG_7202[1]Having done this recipe a few times, I am ready to strike out on my own and make our first official Kitchen Table Kimchi. The directions below are the same you will use when you make your own.
             There are 2 cardinal rules when it comes to home fermentation -
             1. Make sure all of your containers are clean and sterile! If you are using glass or crockery, a weak bleach solution works great. Make sure it is well rinsed and wiped dry when you finish with the bleach. The ‘sniff test’ works great when you are done. If, after 10 minutes or so you still smell bleach, rinse it again. If you are using plastic in any part of the process, use white vinegar or citric acid as your sterilizing agent.
             2. If it’s covered in brine, all will be fine. Simply put, always make sure the vegetables you are fermenting are completely submerged in the brine solution in your fermentation container. This will greatly reduce the chances of getting mold or unwanted bacterial processes.


IMG_7203[1]I will be fermenting our kimchi in two 10 litre German fermentation pots we purchased through Amazon. Napa cabbage is not in season right now, so I placed an order with Fareway in Waukon and got it the next day.
Remove any wilted leaves from the outside of the cabbage, quarter it lengthwise and trim the stem end. Cut across the quartered cabbage every one or two inches, depending on how you like your kimchi. We prefer the one-inch-wide slices. When all four quarters have been sliced, put the cabbage in a large bowl and sprinkle 1 tablespoon of kosher salt over it all. Mix well by hand to distribute the salt evenly throughout. Repeat this process until you filled your bowl and salted all the cabbage you have. I have found one tablespoon of salt sufficient for one cabbage; 2 cabbages – two tablespoons, 4 cabbages – four tablespoons, etc.
Once you have sliced and salted all the cabbage you are going to ferment, let it sit for a couple of hours. I am using 10 heads of Napa cabbage here, so I’ve got a pretty good-sized container, as you can see!
While you are waiting on the cabbage, slice your onions and julienne the carrots and Daikon. When that is all done, add it to your waiting cabbage and  mix it all in by hand. I IMG_7204[1]couldn’t find Daikon radish anywhere (wrong time of the year) so I am going to use organic red globe radishes purchased at the Oneota Co-op in Decorah. The red radish will add both complexity and spiciness to the kimchi.
Mix the remaining ingredients in another bowl and set aside until the two hours have passed. When the cabbage has rested for a couple of hours, add the rest of the ingredients you mixed up while you were waiting. Mix by hand until the wet mix is evenly distributed throughout the cabbage. Pack it into your fermenter and push it down with a wooden ram or your fists until you see the liquid coming to the top of the cabbage. Place a plate or some type of cover over the mix and weigh it down. A jar full of water works nicely for this. Cover it all with a towel (or put the lid on the bucket) and let it work it’s magic for a week to ten days.

IMG_7205[1]
IMG_7206[1]
IMG_7207[1]

Wednesday, January 14, 2015

The Unadulterated Joy of Home Fermentation

IMG_20150114_082318_858[1]
     2014  was a banner year for Mary and me. It was the year we discovered the joy of fermenting your own foods. With that discovery, came an added benefit unsurpassed in its nutritional benefits. Fermented foods are absolutely chock-full of probiotics; these are jars of living food, nourishment for our bodies and souls. There is no greater satisfaction at mealtime then eating food you have grown, processed and put away. And, when you do those things together, it becomes soul food.
     2014 was a banner year for our gardens as well, especially the cabbages. Bumper crops were the norm for red cabbage, Napa cabbage and the regular old green cabbage we planted. With all these cabbages and only so many CSA customers, we needed to come up with a way of preserving the cabbage bounty we had on hand. I have never been a big fan of sauerkraut (until we made our own – another story for later) and one can only make so much freezer coleslaw (an old family recipe of Mary’s), so the natural inclination was to make some kimchi.
     Kimchi is a traditional Korean dish with origins dating back to the 12th century. It is basically a mixture of cabbage and an assortment of other vegetables like carrots, radishes, turnips and other root vegetables, fermented and all spiced up to give it a little (or a lot) of zing. Kimchi is a time-honored tradition in Korea with regional and family variations in infinite varieties. It can be fermented for a matter of days, weeks or months, depending on the vegetables used and the season in which it is to be consumed. Winter kimchi was meant to be consumed over the course of the long Korean winter so it was made to ferment slowly over a period of months. The kimchi made during the winter months was used as an addition to main course dishes like soups and stews. Spring and summer kimchi is a much lighter and a quicker ferment, so it is used as a side dish or in salads.
     Our first kimchi was pretty simple. Napa cabbage, Daikon radish, chili powder, fish sauce, salt and Sriacha. We fermented the first batch in an old Red Wing 2-gallon crock with a weighted plate on top to keep out the bad bugs. The end result of that first batch was flat-out delicious! We allowed it to work about two weeks and put it into jars. We kept the jars loosely sealed in the basement so they could continue to work and age. It didn’t last long. We gave away a lot of it and ate even more. It became a side dish staple here at our house. Take my word for it, there few things better in life than a little dish of your own kimchi and a dark, malty beer to go with it! Since that time we have refined the recipe and have begun using authentic Korean hot red chili powder, salted fish sauce as well as more traditional Korean equipment.
     As you will see over the next few days, this not a difficult process. You do not have to bury the pot in the back yard, nor does it stink up the house. It is simple, not a lot of work and anyone can do it. Just because we have chosen to use some specialized ingredients and equipment, it doesn’t mean you will need to do that. If you don’t have any crocks, you can use a food-grade plastic bucket with a fermentation lock and achieve the same results. We did a batch of sauerkraut in one of those buckets we obtained from one of our CSA clients in Decorah, IA – “From Grain to Glass”. I’m sure Brad and Amber would be happy to set you up and send you the equipment if you contact them with your needs.
     Today is January 14th, 2015 and I sitting by the kitchen window watching and waiting for the UPS driver. He is bringing our 10 liter stoneware fermentation pot to us. I have been tracking the shipment ever since I ordered it. This morning at 6:07 AM it left Decorah for our house. Sure wish he delivered in alphabetical order – we’d have had it 2 hours ago! The recipe I will be using for this incredibly informative and entertaining series of blog posts is a basic recipe we found online. As we go through the processes on this batch, we will explain and illustrate each step along the way in an individual post for each step. If you would like to know more about home fermentation in general, I have posted several links and resources at the bottom of this first post.


Books -
Sandor Ellix Katz - “The Art of Fermentation” – An in-depth exploration of essential concepts and processes from around the world. Practical information on fermenting vegetables, fruits, grains, milk, beans, meats and more.
Kirsten K. Shockey and Christopher Shockey – “Fermented Vegetables” – Creative recipes for fermenting 64 vegetables and herbs in krauts, kimchis, brined pickles, chutneys, relishes and pastes. (A well-thought and greatly appreciated Christmas gift from our kids)
Lauryn Chun - “The Kimchi Cookbook60 Traditional and Modern Ways to Make Kimchi


Blogs/websites
PhickleCultured Food LifeCultures for Health